Know the Basic Microgreens Supplies and Why they are Important as you Grow your Yield
- Green Life Now

- Feb 18, 2022
- 4 min read
Updated: Feb 20, 2022

You can start growing microgreens in just small amount of money. Microgreens grows quickly ready to harvest in just two weeks, it doesn’t matter how much growing space you have or gardening experience you have, as long as you have access to light, including artificial light, right supplies and spare little hour a day, you can start growing microgreens and make a profit.
Always remember all supplies should be sanitized every after use to avoid mold which grows normally in microgreens environment. It never hurts to disinfect your gardening supplies.
List of Basic Microgreens Supplies
> Microgreens Shelf

Microgreen Shelfs are used to optimize the costly footprint of growing facility, not only optimize space but also save energy and maximize profits.
The use of shelf vertical planting maximize the use of your vertical space for high cultivation.
> Microgreens Growing Trays

Choose growing trays that are lightweight, durable and reusable. Through re-using you’ll save time and money. And if the tray you have is not that sturdy, it’s recommended to double it to provide extra stability and strength.
Microgreen can grow about 1 inch to 2 inches deep. You can grow microgreens in shallow container which makes harvesting easier but will need frequent watering. You can also make your own tray, just punch holes in the bottom to retain sufficient water and drain the excess water. For the size it will depend on the number of microgreens seeds you want to grow. Just always remember not to over sow the tray, sowing deep can lead to slow down production rate. Getting the seed space correct, will ensure moisture and nutrient absorption of microgreens growth.
Growing trays can be with or without holes, none is better than the other. It depends on the type of microgreens you want to grow and how you want to grow it. Most importantly the soil must always remain moist. For some they use both to eliminate frequent watering. They use the tray with holes to hold the soil and seed, then put water in the tray without holes and submerge it in the tray with holes, by doing this it allows soil to absorb water.
> Microgreens Humidity Dome

If the growing space is too hot, too cold and even humid it may result to damping off. This can be avoided through covering your microgreens and helps retain heat and moisture that will speed up sprouting process. And once the seeds have germinated you can remove the cover.
Note that if you don’t get 40-50% humidity rate you can invest for humidity dome. This is efficient supply to keep the microgreens seeds moist and minimize water evaporation.
> Microgreens Growing Lights

Having enough lights helps microgreens to grow actively and provide resistance to diseases like damping off. Window with low light will not be enough, if this is the case and natural light is not available you can use artificial lights for microgreens such as fluorescent (TL) tubes and LEDs.
Using LED or T5/T8 fluorescent light with minimum 2 feet or 4 feet to cover 1020 flat trays, is the ideal and common set up in growing microgreens. It’s easy to assembly in small area and supply supplemental lightning to grow microgreens. Allow your grow lights to run at least 14 - 16 hours once the new germinated flats go under them.
> Light Meter

Light Meter is measure through lux/lumens or foot candles, its helpful tool to know the light your microgreens are receiving and importantly know the spot where it can get optimal light.
> Microgreens pH Pen

pH or potential hydrogen measure the acidity and alkalinity of your water. pH Pen provide handy and quick way of measuring pH level of both liquid solutions and soil slurries to ensure maximum uptake of nutrients of microgreens.
Microgreens grows best when water you’re using is about 6.
> Microgreens Electrical Conductivity Pen

Electrical Conductivity or EC is the reading of dissolved fertilizers in a solution, its important use in growing hydroponic microgreens. It’s normally expressed in siemens per unit area or S/m. The higher the EC reading the higher or increase in osmotic pressure that can prevent the microgreens from absorbing nutrients. And with lower EC it can badly impact the yield. Having appropriate amount of salt and fertilizer can balance the level of EC.
> Microgreens Spray Bottle

Using spray bottle helps keep microgreens stay moist but not overwater, and keep the seeds from drying out during its germination stage. It’s important not to overwater your microgreens to provide enough time to evaporate and avoid fungi and molds built up.
Frequent watering usually happens when microgreens are grow outdoors whereas if grow indoors or in greenhouse it already retain moisture better without frequent watering.
Consider as well the use of light heated water rather cool water when watering microgreens, cooler water slow down the growth process of microgreens.
> Microgreens Garden Hose

You can also water your microgreens by using a garden hose, just remember the pH balancing pre- soaking, when to water and how much of it is needed.
Its pressure makes it also effective tool in cleaning garden supplies in every after use, to ensure it sanitize and clean very well.
> Microgreens Measuring Glass
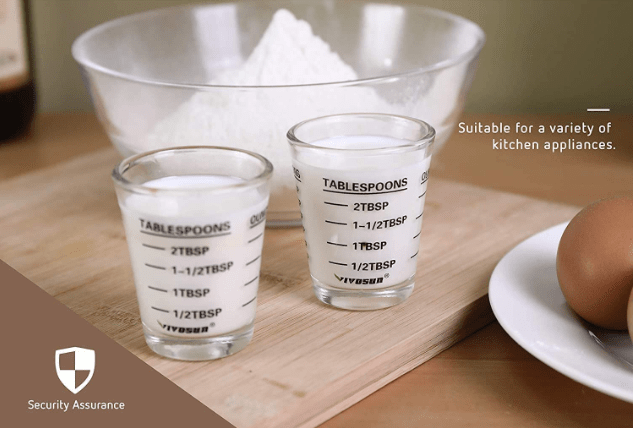
Measuring Glass is great and efficient tool in mixing nutrients and sanitation for your microgreens. It typically highlights the measurement in teaspoons, tablespoons, ounce, and milliliters. And it makes planting so much easier when mixing liquid fertilizers, than with regular measuring spoons.
> Microgreens Harvesting Blade

Cutting microgreens involves shearing the tops of plants and dislodging the stems. Use sharp harvesting blade or produce knife instead of scissors, as they can somewhat bruise the stem that shorten the shelf life.
It’s worth investing for sharp knife than using dull blade and make your harvesting a nightmare.
It’s a rule of thumb to clean and sanitize microgreens supplies every after use, try to isolate your supplies as possible especially if you are growing indoors. It prevents infections such as fungi, mold, bacteria that can built up in soil.
Learn more about Growing Microgreens:
Impact of Fertilizer & Sanitation to Prevent Disease and Maintain Nutritional Quality of Microgreens
Comments